Getting Started with GigSasa
Welcome to the GigSasa Family!
We’re happy to have you aboard one of the revolutionary platforms for scheduling
your team jobs and tasks, tracking your teams time and activity, and performance
analytics. GigSasa offers the ability to monitor how and when your teams check
in for their jobs, how much time they spend on average working, and more.
It can be hard to learn a new platform, but we got you! This guide provides you
with all the information you need to configure GigSasa for your business.
In this guide we cover simple steps for setting up your
account
Setting up your business
Setting up your account to mirror your business will make it easier and faster to
schedule in GigSasa. Upon initial sign up, you’ll be taken to a let’s get
started section where you’ll be prompted to select between creating a new
business and joining a team.
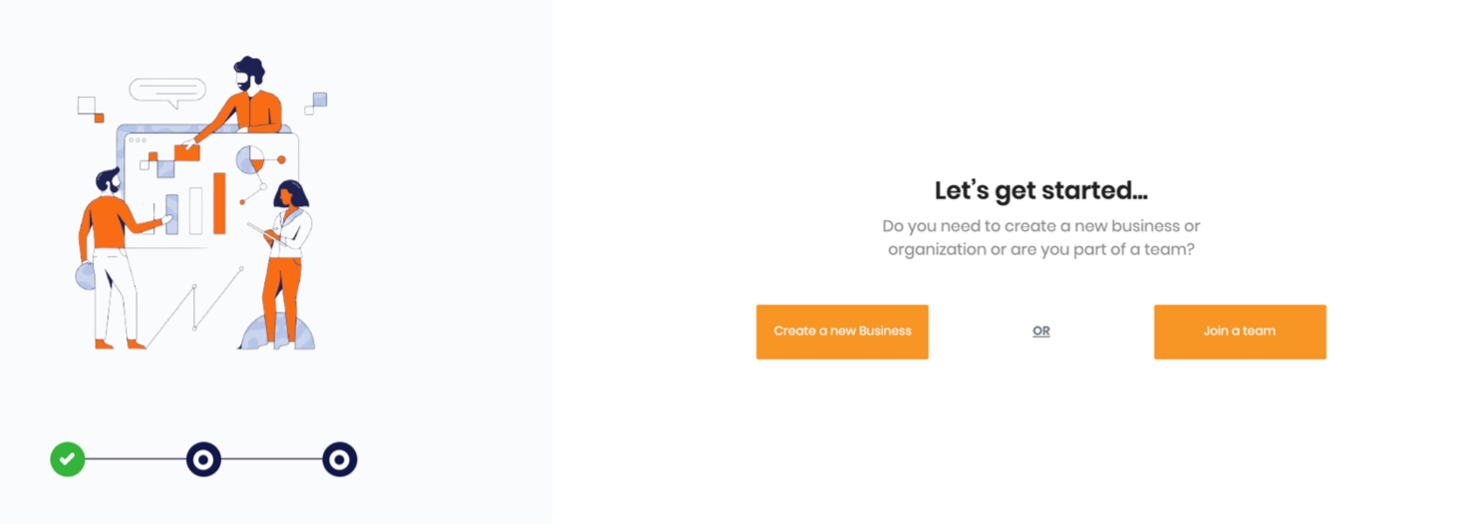
Create a new business to mirror your actual
business
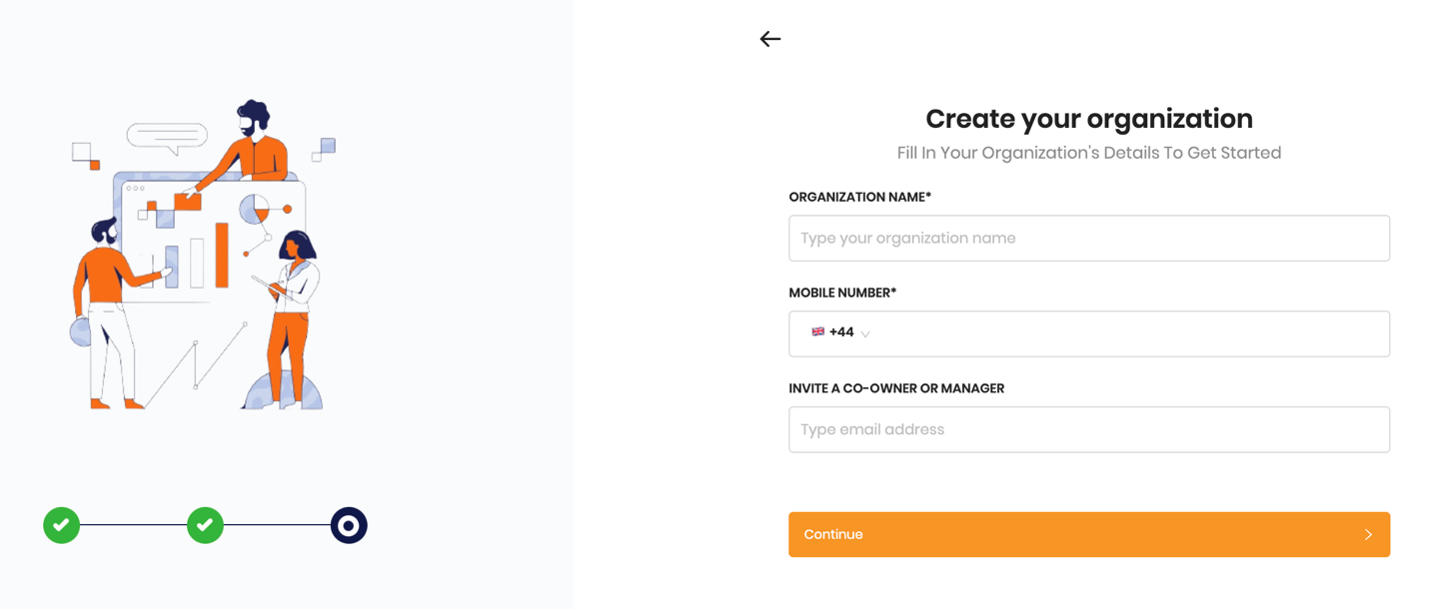
Fill in your organization’s details.
Enter the name of your company, your mobile phone number, and if you’d like to have
a colleague have equal access as you, invite them as co-owners. If not, click on
continue.
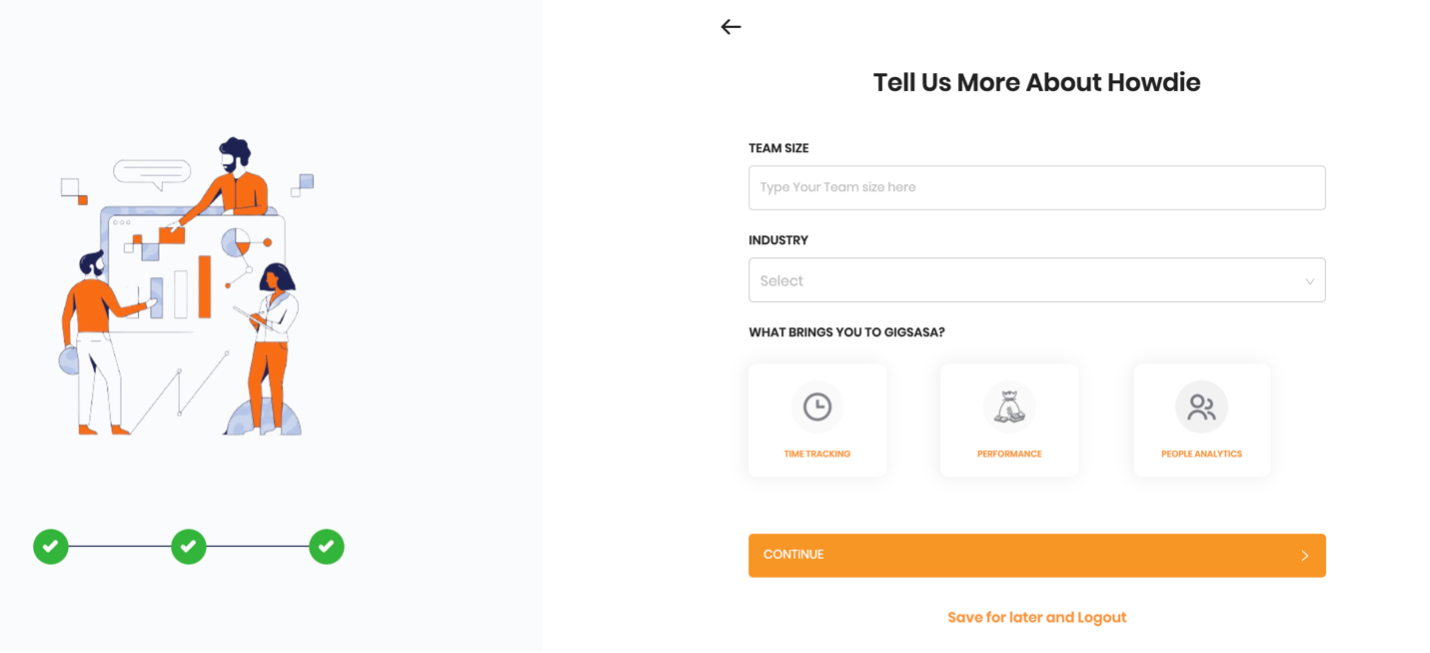
Tell us more about your company by entering your team size, the industry you operate
in and select what brings you to GigSasa.
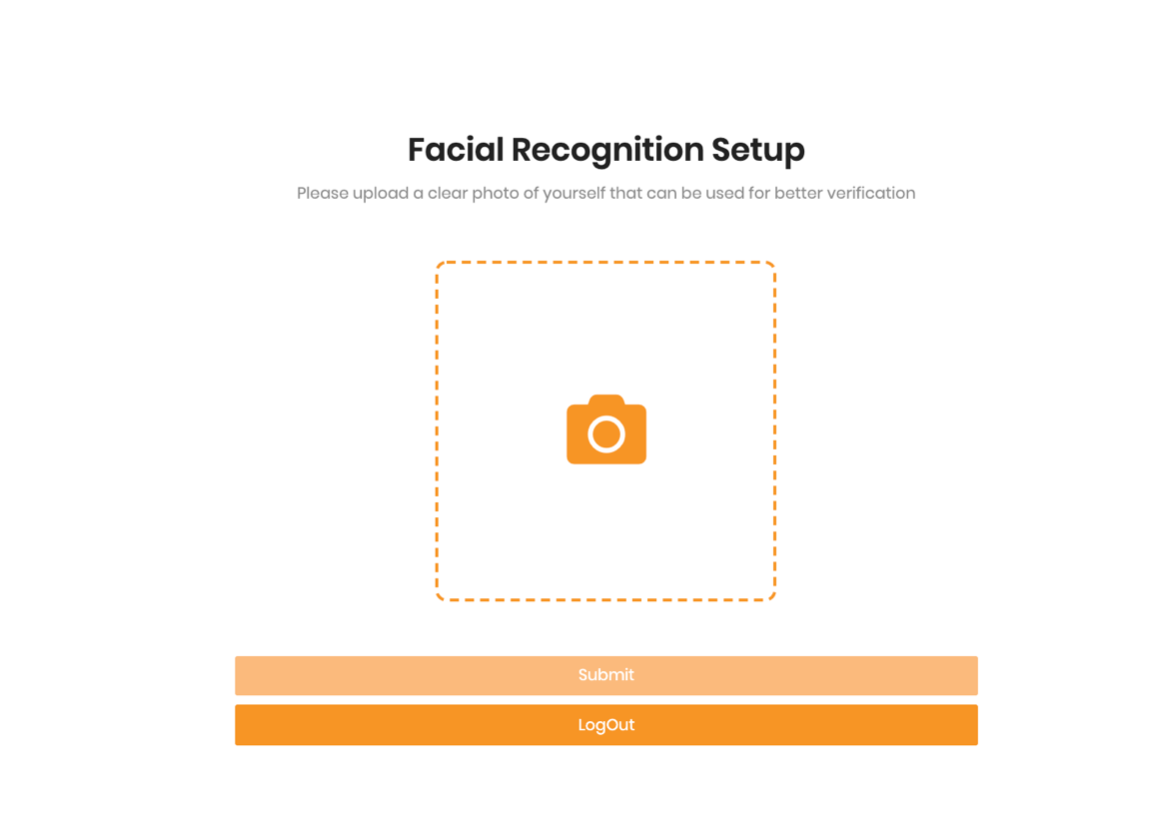
Allow your face to be captured on the facial recognition setup. The photo captured
will be used as your profile image on your dashboard. If enabled for facial
recogntion, the photo helps train the facial recognition model. You can always
change the photo. Click on submit and you’ll be in the taken to your dashboard.
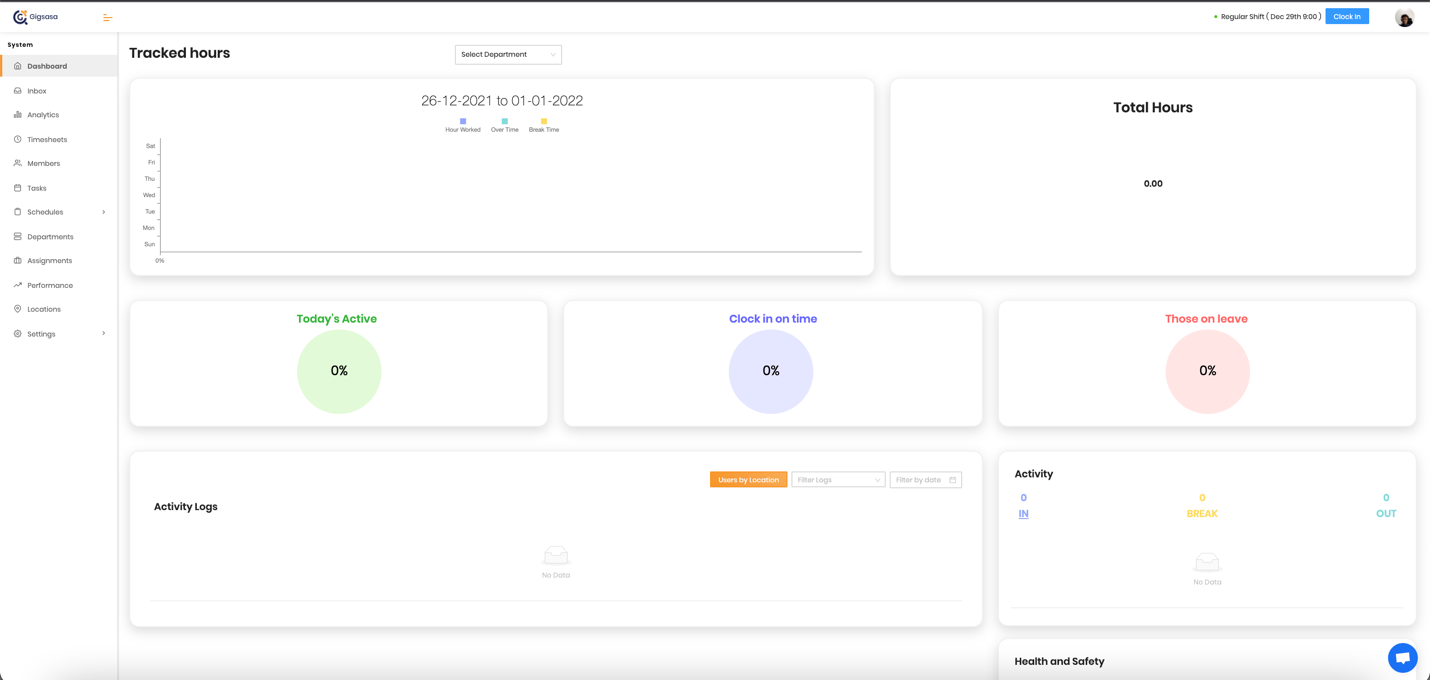
The Dashboard
The dashboard offers a snapshot of all the items we offer.
View tracked hours, percentage of active(currently clocked in) employees, those
on leave and an overview of the activity logs.
Setting up your departments
Departments are an easy way of organizing and bundling teams working on the same
tasks. Your company could be divided into several departments, branches, or
teams. For instance, if you own 3 coffee shops located in 3 different cities,
each coffee shop will have its own manager who oversees virtual staffs. As the
owner, you can invite the branch managers of the coffee shops to each manage
their accounts (in this case, coffee shops) separately. As the manager, you get
to view each coffee shop with its own stats on your dashboard.
Setting up a new organization is very simple, and you can have an unlimited number of
organizations in your account.
Step 1. click on the Departments tab on the left sidebar.
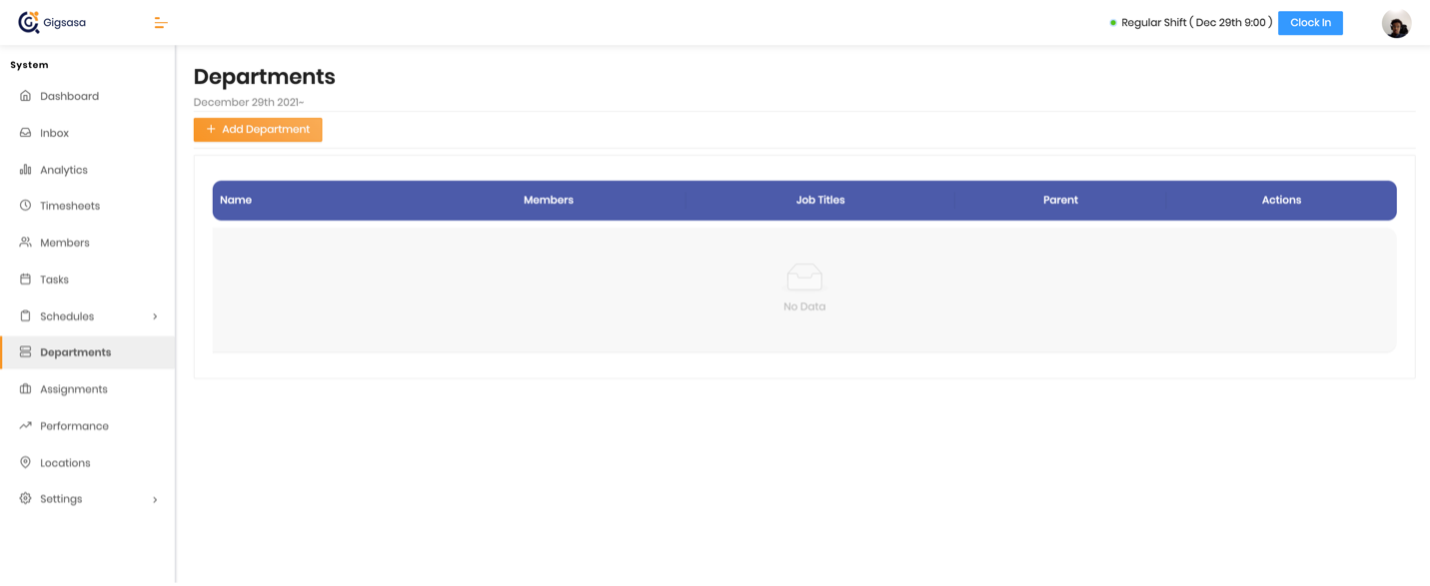
Step 2. locate the button to add an organization.
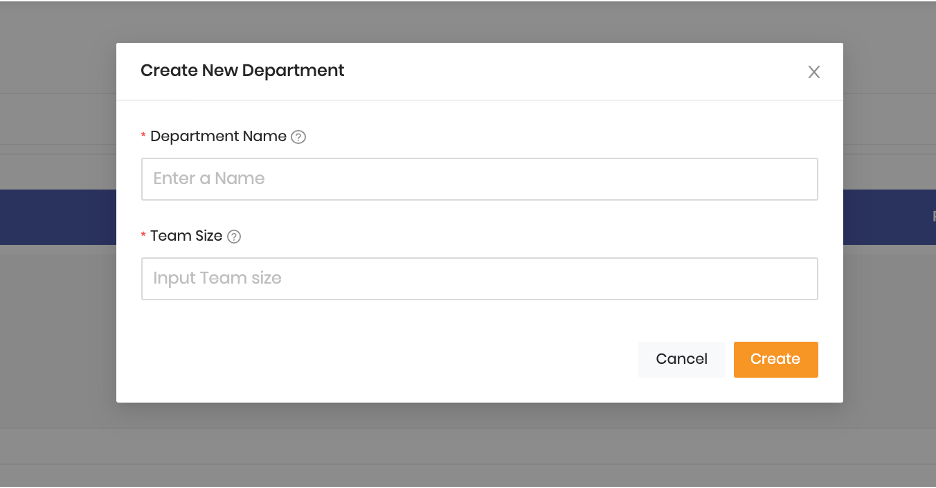
Final Step, fill in the details of your organization on the pop-up
form and click create!
Inviting team members
Invite team members to your workspace. When you invite teams, they will receive a
mail to join the existing workspace.
You can invite a single team member or import your organization’s bulk employee
data.
Option 1
Add members to your organization with these three easy steps.
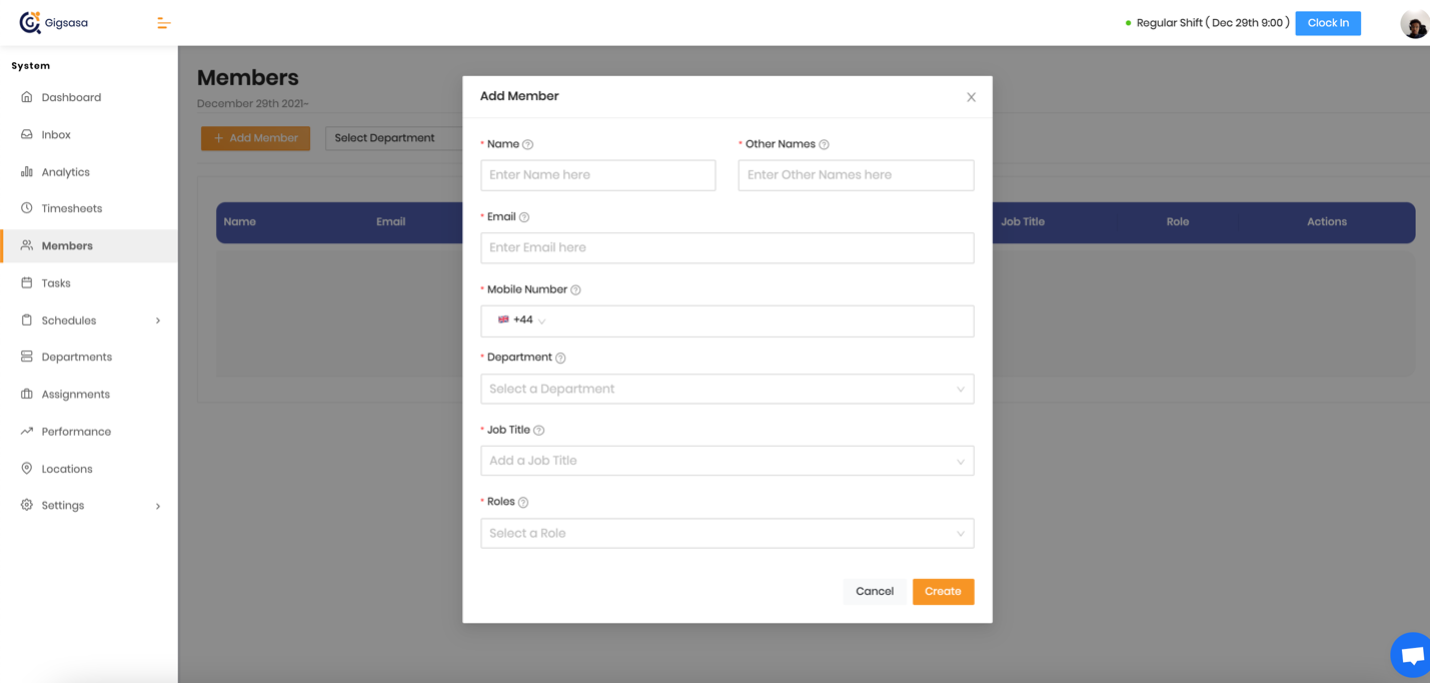
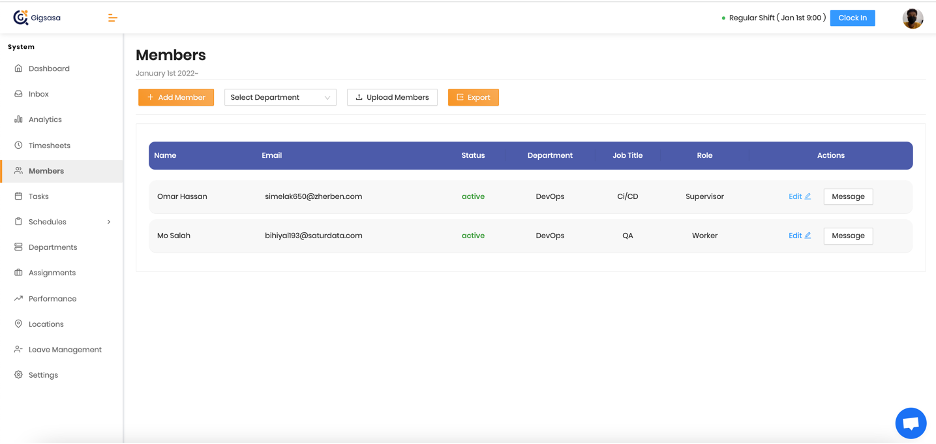
Step 1. Click on the Members tab on the left sidebar.
Step 2. Click on the Add Member button.
Final Step, fill in the details of your organization on the pop-up
form and click create!
Option 2
Adding team members via Excel Spreadsheet
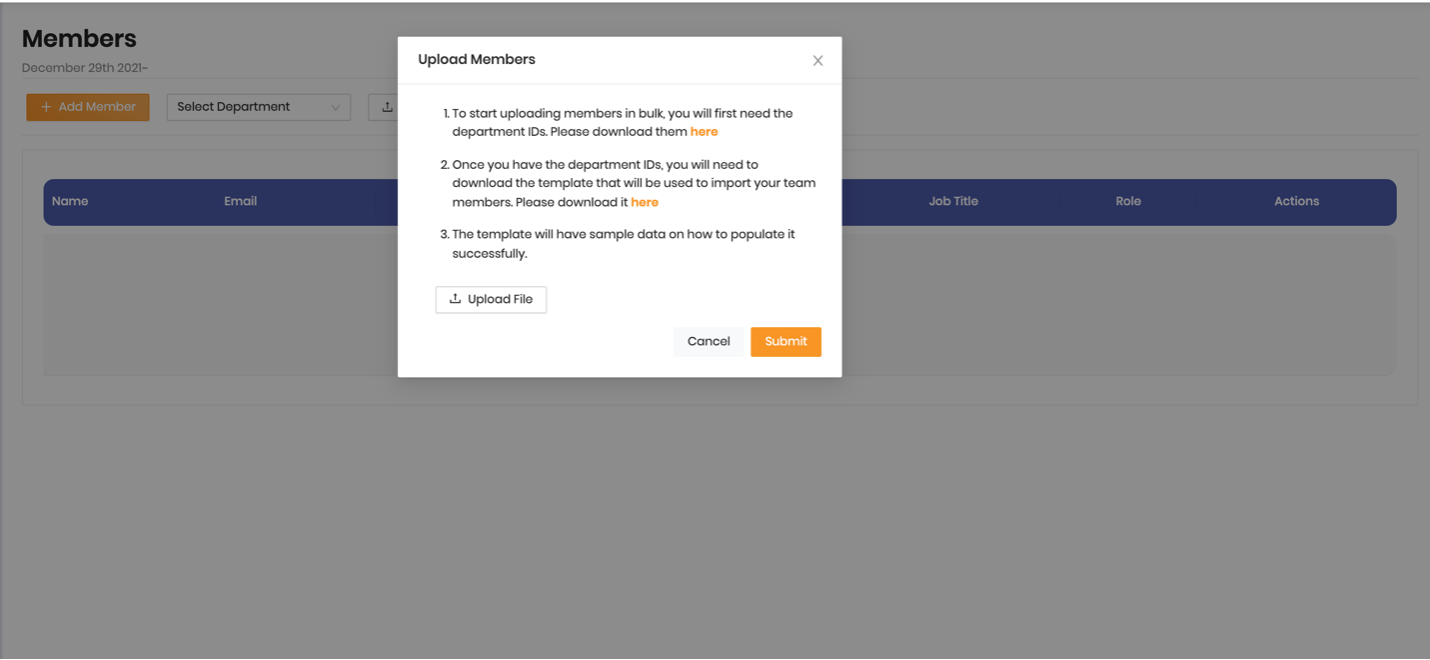
Equally select the import member’s button.
Note: The import feature needs your file to be in the specified
format.
If you have your team members in a simple Microsoft Excel file, you can also add team
members via Excel spreadsheet. For a downloadable template, click on the download
link. First you’ll need to download the excel file containing department IDs.
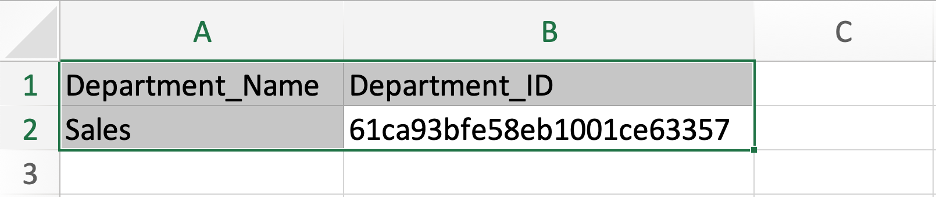
Second, download the specific download template.
Please remember to remove the sample team members, and to save/download the file as
a CSV file.

To get the most accurate information, fill in the spreadsheet with the fields above
as shown in the screenshot (full name, email address, role, mobile no., job type,
organization) Ensure that the file is saved.
Now head over to the Members page via the Navigation bar and click ‘Upload Members’,
and when the drop-down menu appears, click ‘Upload File’
Shift Management
In this section, we guide you on how to schedule work shifts for your team. As an
admin, you can easily schedule team tasks and automatically monitor the attendance
of your team. Easily create recurring or one-time shifts, view schedules for your
entire team or individual members, and view the shift status of clocked-in members.
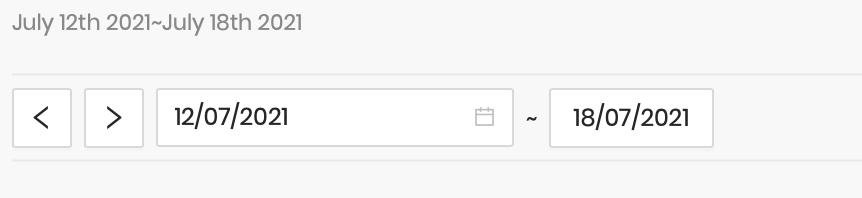
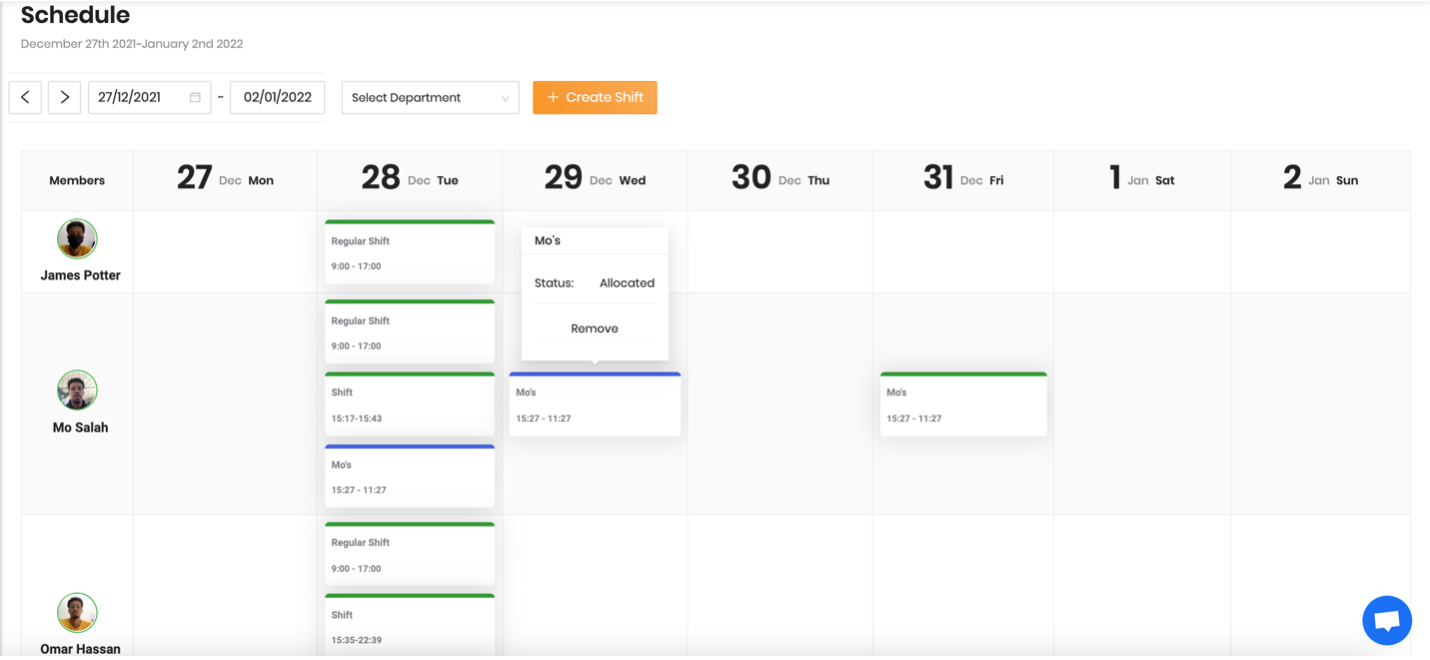
Start by clicking the Schedules tab on the left sidebar.
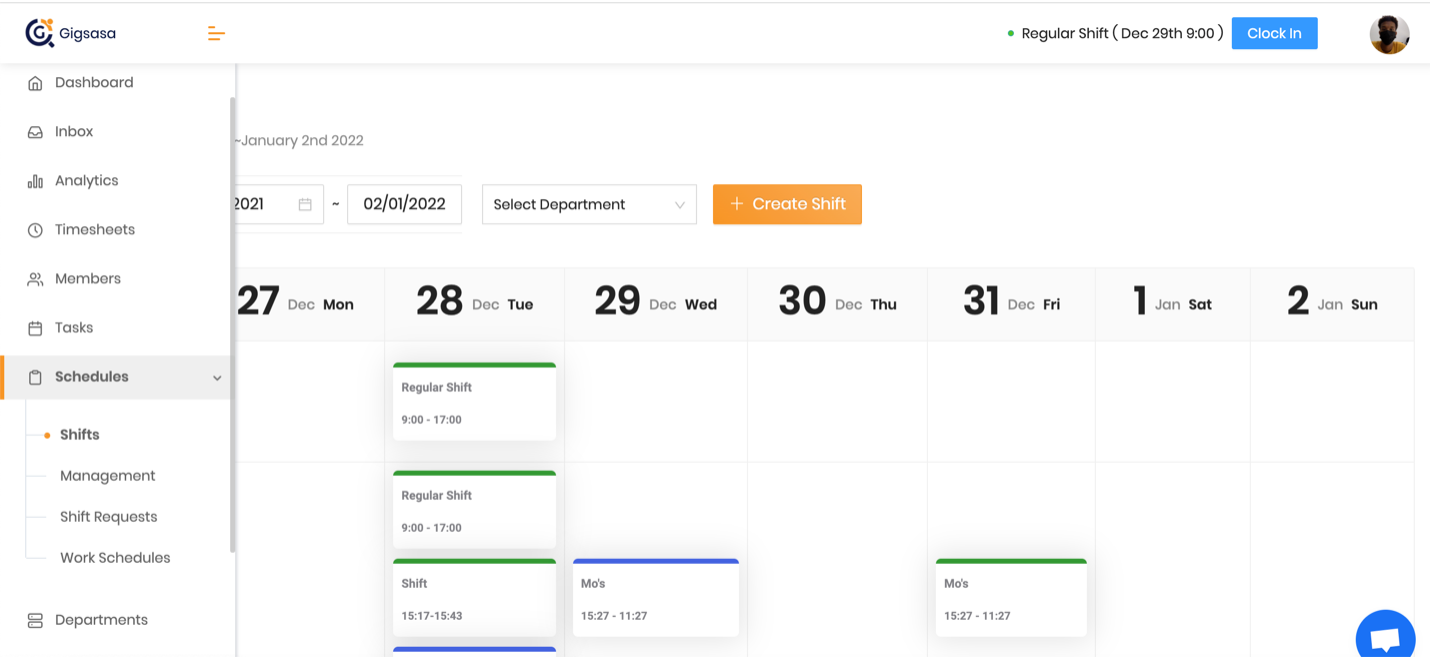
Here you can navigate to previous or future weeks using the navigation arrows.
By default, all users on your team will be shown here if they have scheduled tasks.
Creating Shifts
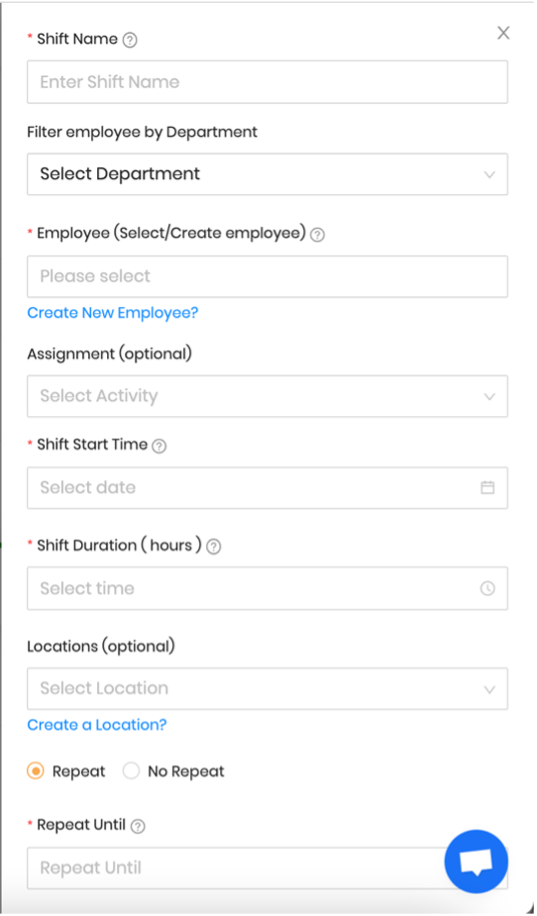
Click the Create Shift tab on the left sidebar to create a new shift
Fill in the details below:
- Shift Name
- Select an employee or multiple employees
- Fill in the shift start time
- Enter the minimum hours of the shift
- Enter assignment (project/customer)
- Select location of the shift (optional)
- Choose between repeat and no repeat shift patterns.
- For Repeat Shift Pattern option, enter the shift repeat until date
Select the days the shift will repeat
- Click on Create to save changes.
After creating a shift, you will see the schedules plotted on the Shifts screen
Deleting Shifts
You can delete a shift by clicking on the shift you created under Shifts.
After clicking on the shift, you will receive a popup window where you can Delete
or Edit the schedule.
Click on Delete to remove the schedule.
Swapping Shifts
Make it simple for your team to trade shifts and spend less of your time managing
shift changes and swaps.
Find staff to cover empty shifts at the tap of a button
If an employee can’t work their assigned shift, they can swap directly with a
suitable team member via the recommendation section on the mobile app. Equally,
an employee can request for a shift to be offered to any suitable employee.
Here, shifts will be made available for anyone to claim. The managers can send
offers with one tap.Supervisors can quickly view and approve shift swaps from
the GigSasa
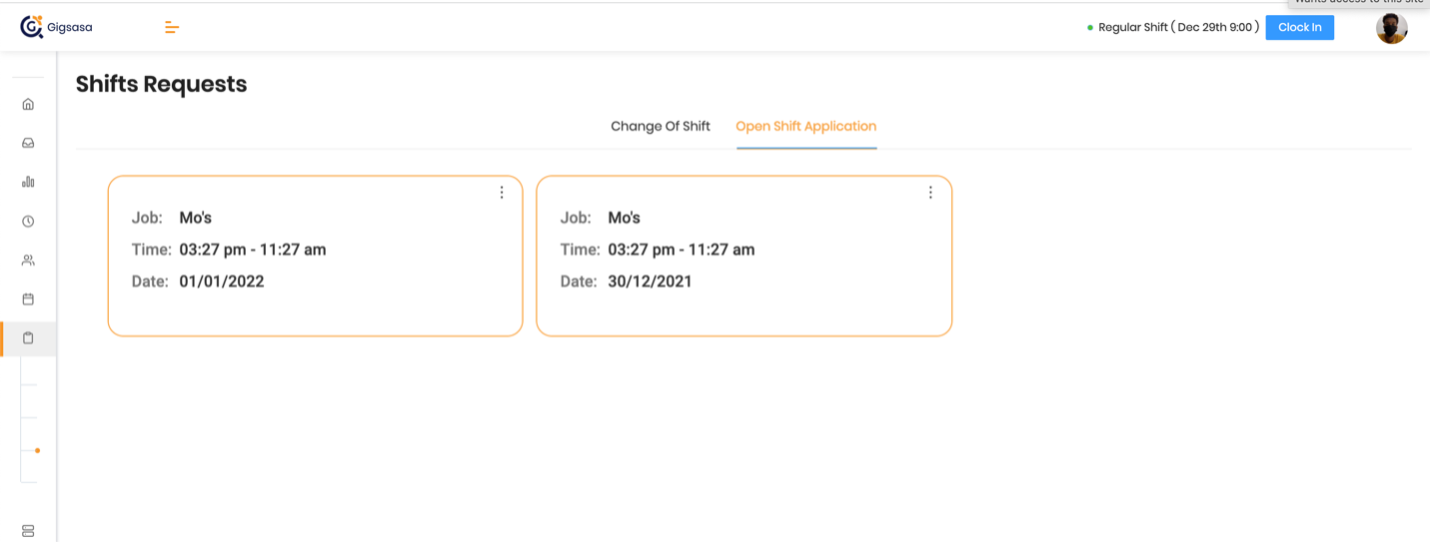
How to Swap/Offer a Shift on the GigSasa mobile app
Click on the schedules tab and select the shift requests section. You’ll see all
the available swap shifts offers on the change of shift tab. Approve or reject
them.
Shift Breaks
Ensure staff get the downtime they need — while maintaining your ideal
coverage.
Easily schedule the right breaks for your team
Plan breaks & coverage to maintain quality service
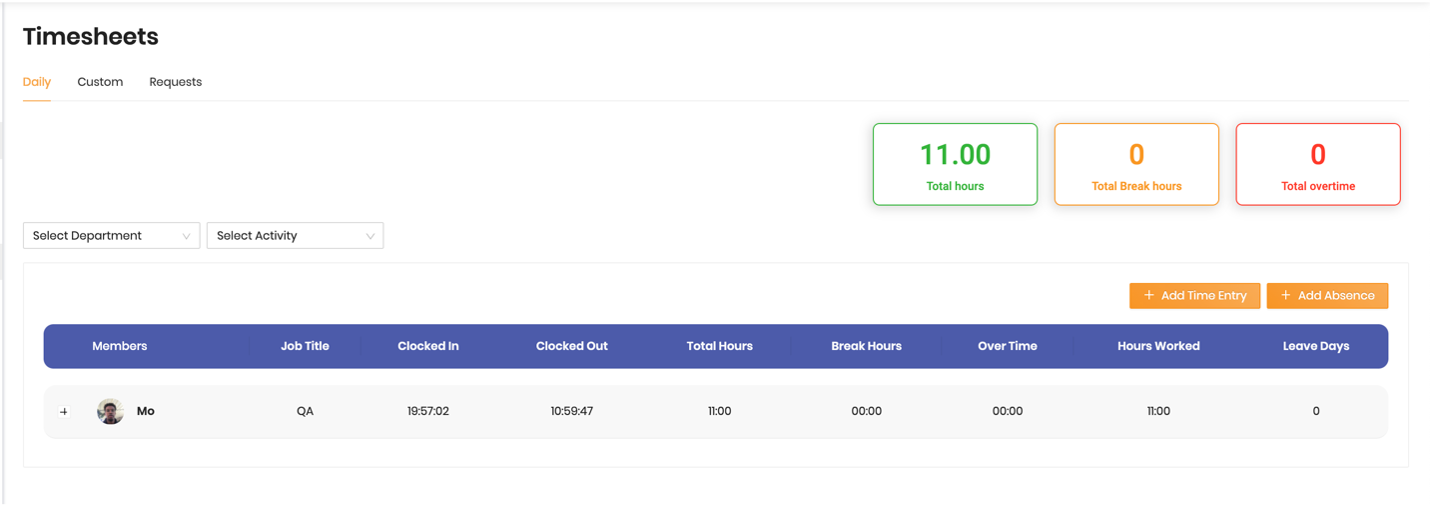
Time Tracking
In this section, we guide you on how to view the timesheet generated from the shifts
worked by your team. As an admin, you can easily view the timesheets of your
employees
Start by clicking the Timesheets tab on the left sidebar.
HHere you can navigate to previous or future weeks using the navigation arrows. Using
the calendar dropdown, you can easily specify the timelines you want to view.
By default, all users on your team will be shown here if they completed their
scheduled tasks.
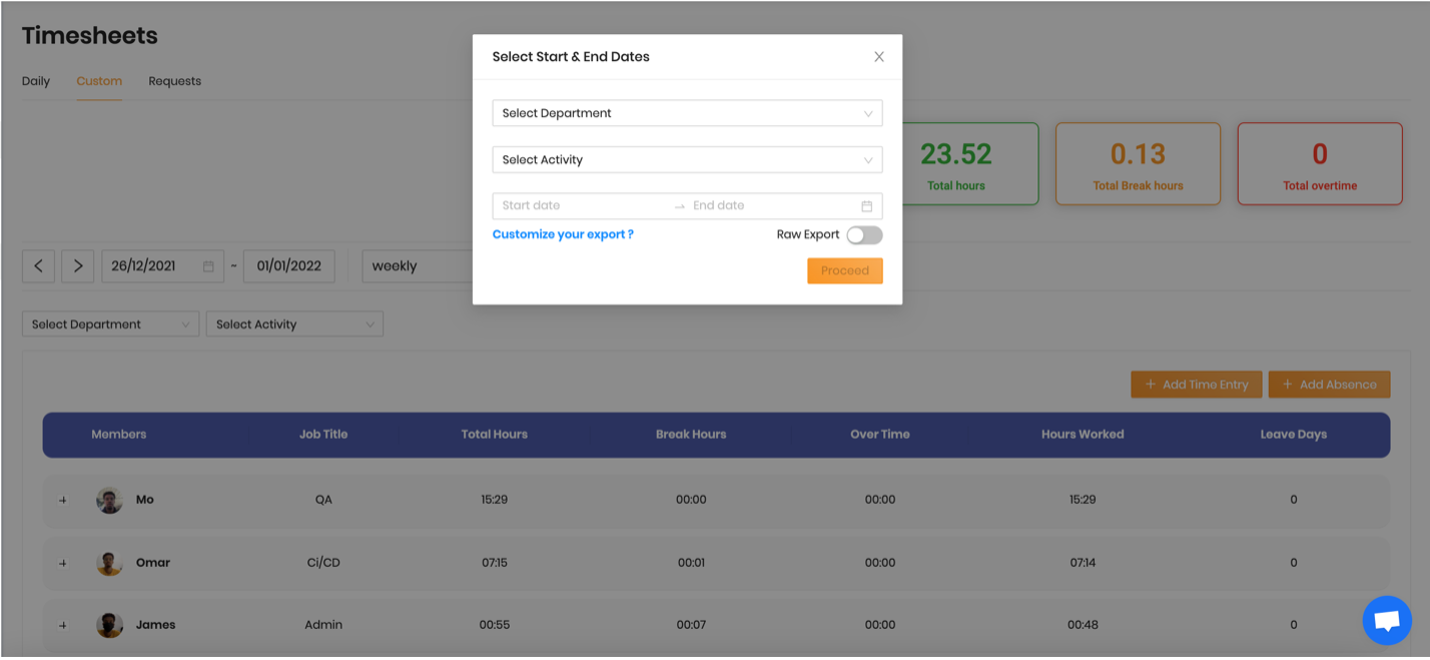
Export Timesheets
To export the timesheets in excel format, start by liking on the custom tab and tap
on the export button.
Select the relevant department you’d like to their data exported, select a specific
activity in case there are any relevant assignments, choose the start and end dates
and finally click on export.
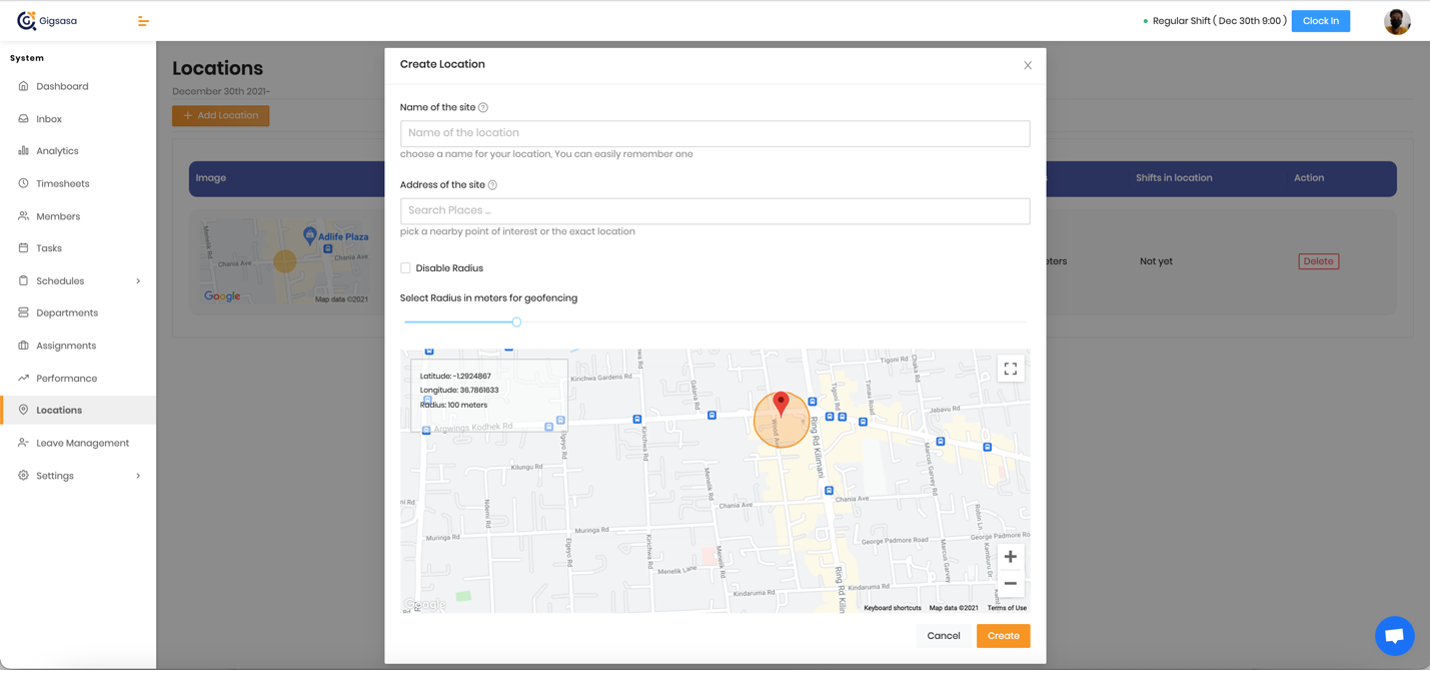
Location Management
In this section, we guide you on how to set up geo-location and geo-fencing for your
team. As an admin, you can easily create a location and set up a perimeger radius to
only allow working in the designated job sites. Locations are the ways to sort and
identify your businesses by their geographical location or a shift’s job sites.
Locations are necessary for team members that are starting their shift via the
smartphone application.
To change your business location, click on ‘Locations’ tab in the sidebar.
Click on the ‘Add Location’ button and fill in the prompt.
Enter the name of the site, it’s address, and if you’d like to enable
geo-fencing, select a radius. If not, check the disable radius checkbox.
Performance Analytics
Get the insights you need on employee performance to help your business thrive. Keep
a clear record of employee performance over time
Receive valuable team feedback after every shift
keep your teams happy and engaged, with the performance questions, so that your staff
can provide insightful feedback at the end of each shift so you can address any
issues.
Use performance data from your team to build high-performing teams. View the
responses and gain valuable insights on your analytics dashboard. Tap into your
staff’s performance over the year with clear reports.
When staff clock out from their shift, they can rate how they felt, and have the
option to provide feedback. Through the performance questions created earlier,
managers can instantly access this information so they can act.
Create a performance record
Select the performance tab and click on the ‘Add Performance’ button. A prompt will
appear requiring you to add a question. The question responses can be in one of the
four options shown (multiple choice, number, free text, attachment, and signature)
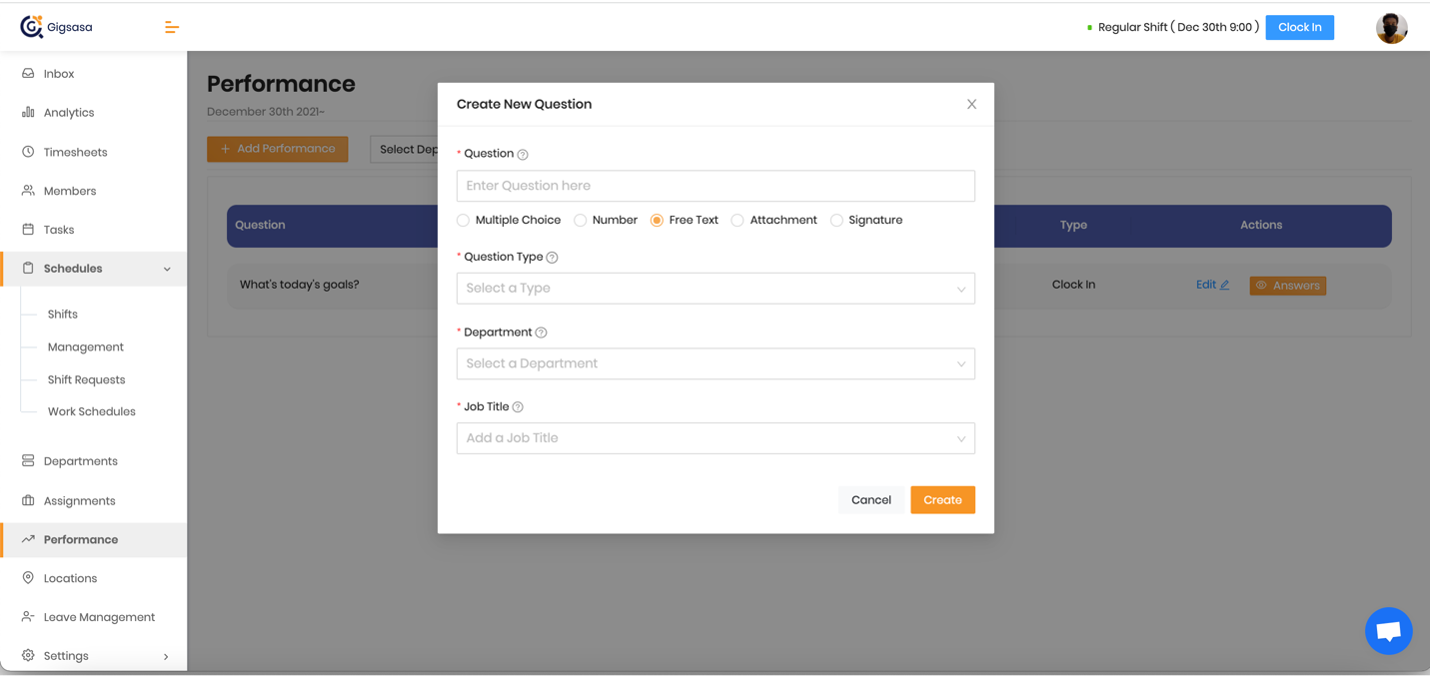
On selecting the multiple choice option, you’ll be prompted to enter the response
options.
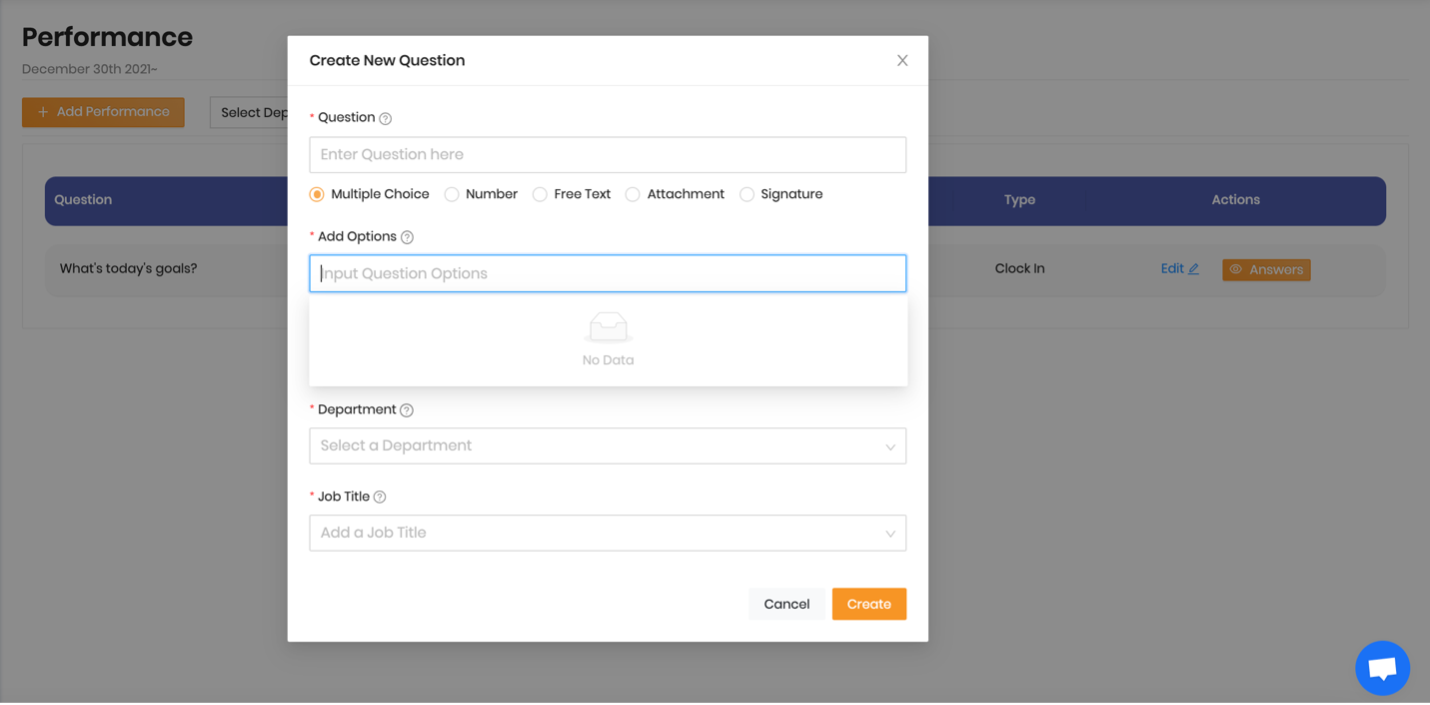
- On selecting number, employees will be prompted to enter a response in number
form.
- On selecting free text, employees will be prompted to enter response in
alphanumeric form.
- On selecting attachment, employees will be prompted to provide an attachment as
a proof of work.
- On selecting attachment, employees will be prompted to provide an signature as a
proof of work.
- On the question type text field, select a clock in or clock out option. The
question will be presented when an employee clocks in or out.
- Also, set specific performance based question for a specific department
and the relevant job types.
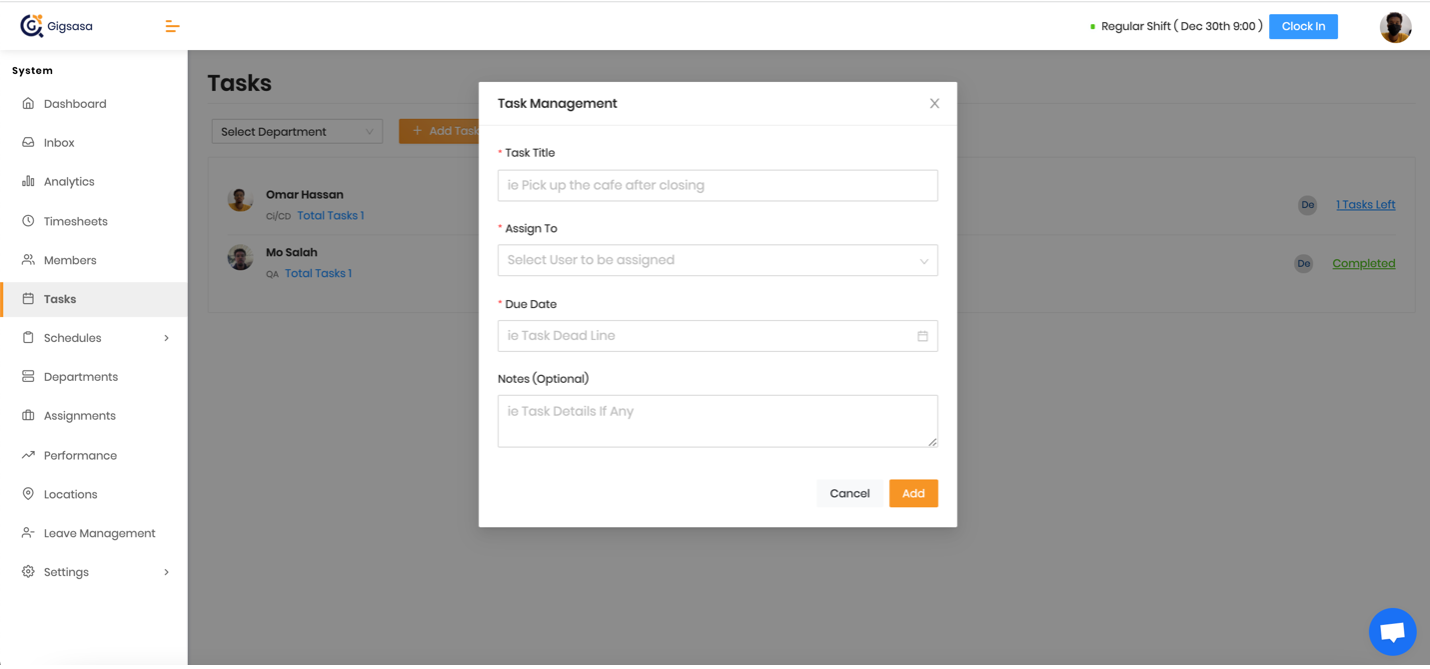
Task Management
The Tasks tab allows you to assign jobs or tasks to team members with due dates and
the ability to mark them complete.
Assigning Tasks to Teams
Use digital checklists to ensure teams follow important procedures
- On your sidebar, select the Tasks page.
- Click Add Task and from the drop-down menu select:
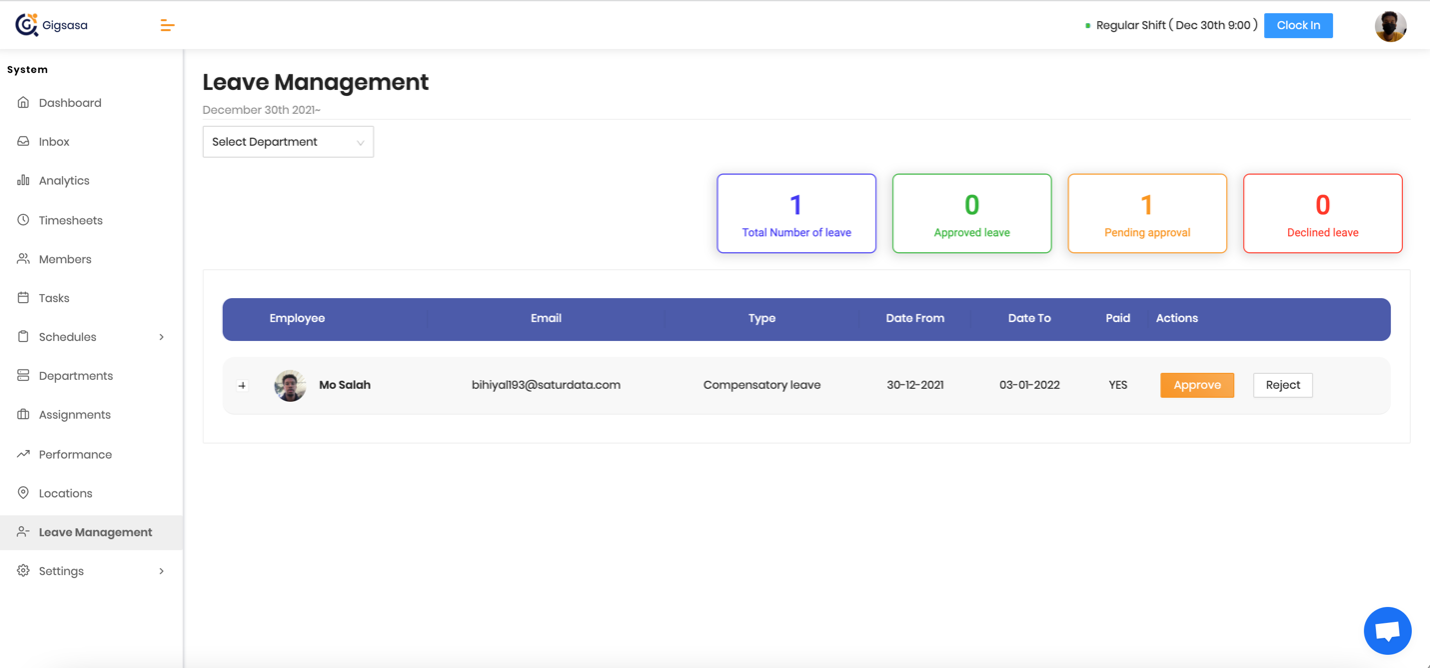
Leave Management
The leave management section gives your staff the tools to manage their availability
and leave. Staff can easily view their leave balances, request time off, or submit
days they’re not available for manager approval.
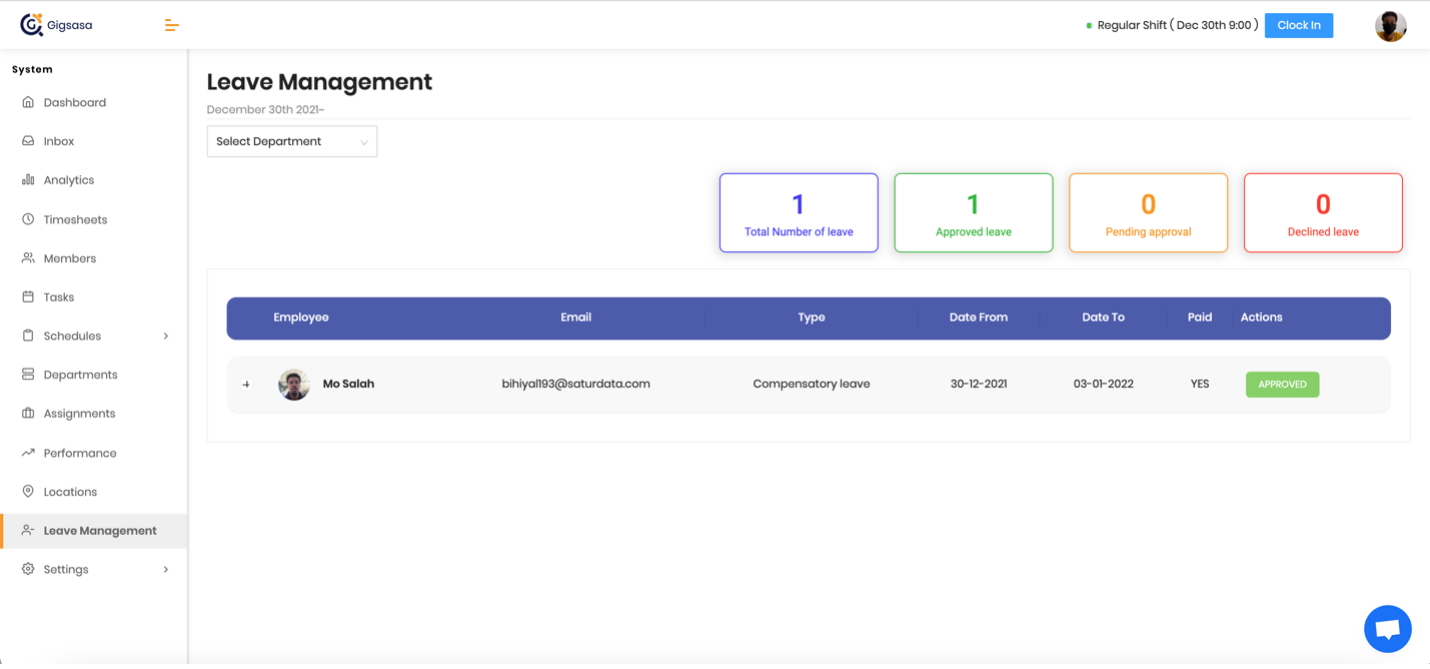
On your dashboard, get a clear picture of leave balances &
requests
Manage your team’s leave from one simple dashboard. View different leave types,
remaining balances, requests, and booked time off
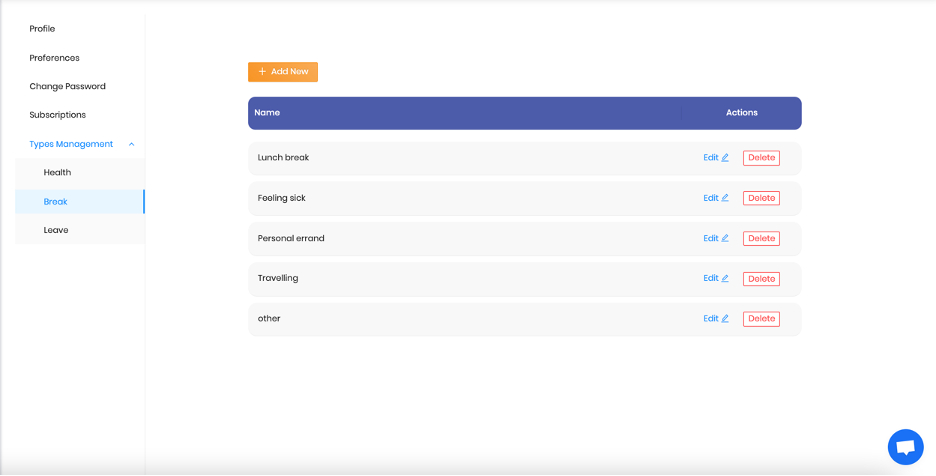
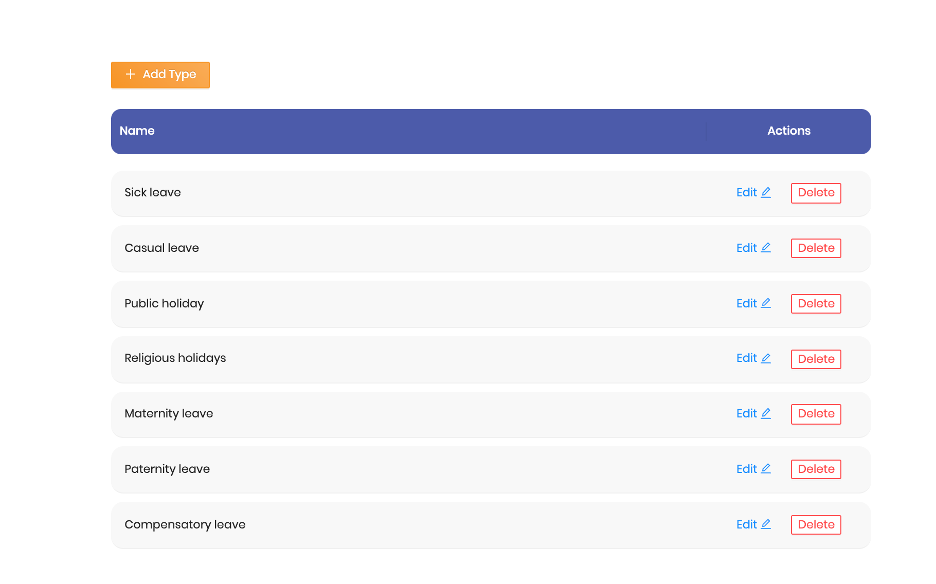
Leave Types
View different leave types provided out of the box by GigSasa
On the 'Settings' tab, navigate to the Types Management section, and click on the
'Leave' section
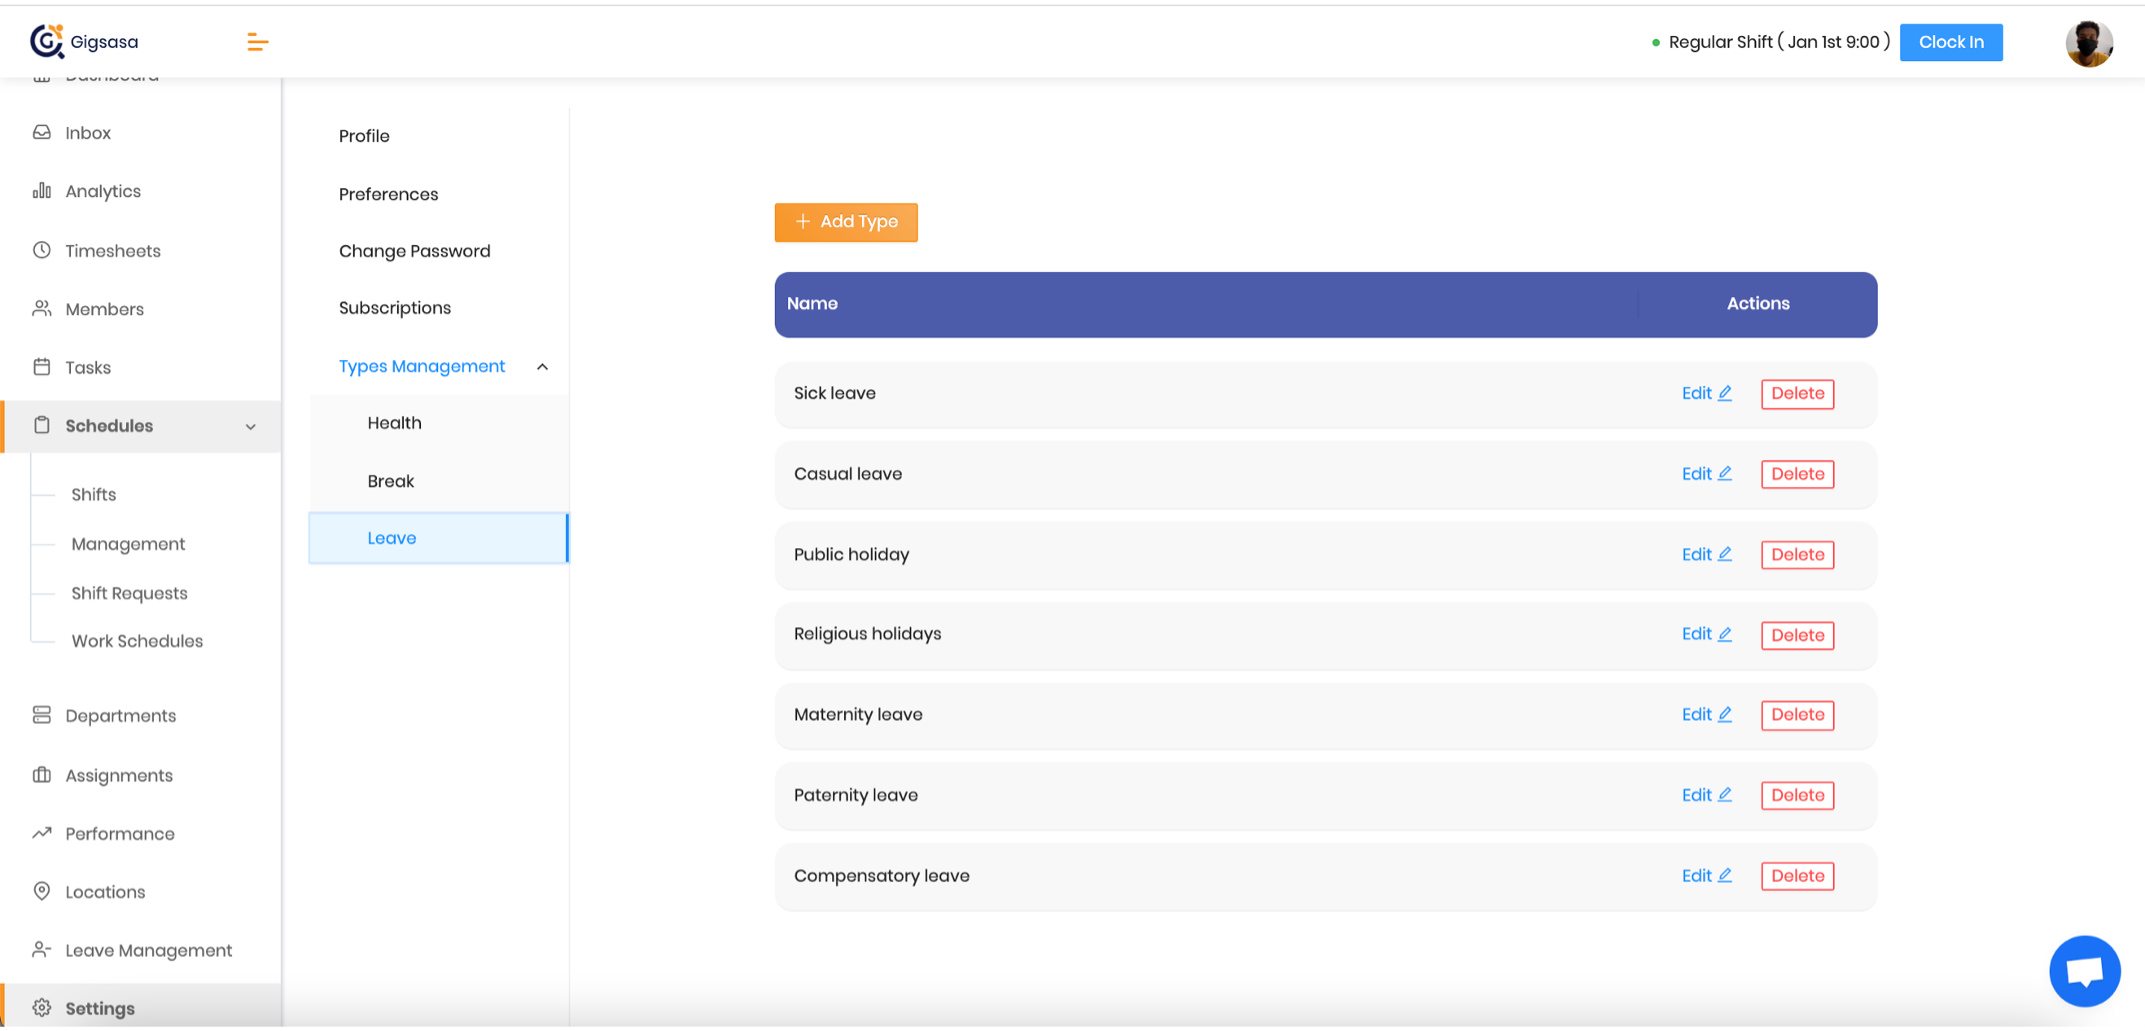
We've created a few leave types for you, but based on your comoany's leave policies
you can delete the ones we've created for you and create new leave types
To create new leave types,
- Click on the 'Add Type' button
Employees can request time off directly through
the mobile app — without any back and forth.
- Leave requests will be viewed on your dashboard as shown
Upon approval, you'll see your staff's leave information displayed on the dashboard
Project Management
In this, guide we'll show you how to create assignments that need to be completed on
a recurring basis.
Keep your employees informed of what they’ll be doing from
the moment they start working.
Create projects or customers that your teams work
on.
On your dashboard, go to the 'Assignments' tab.
- Get an overview of assigned projects each department or team works on
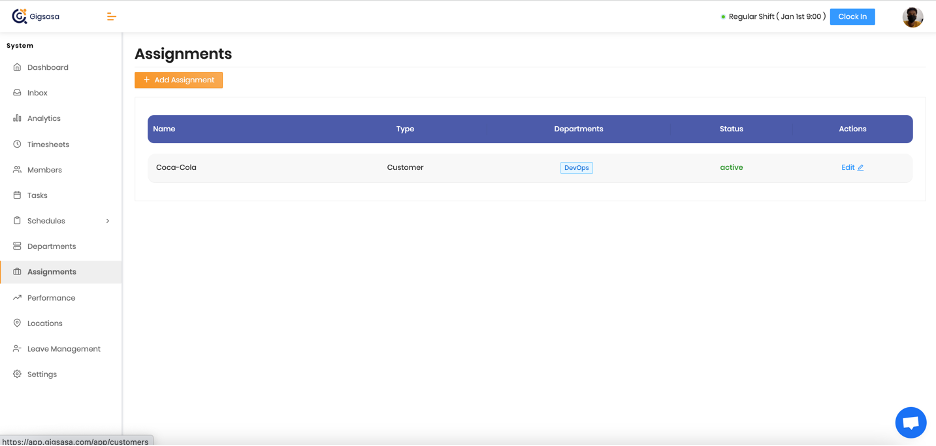
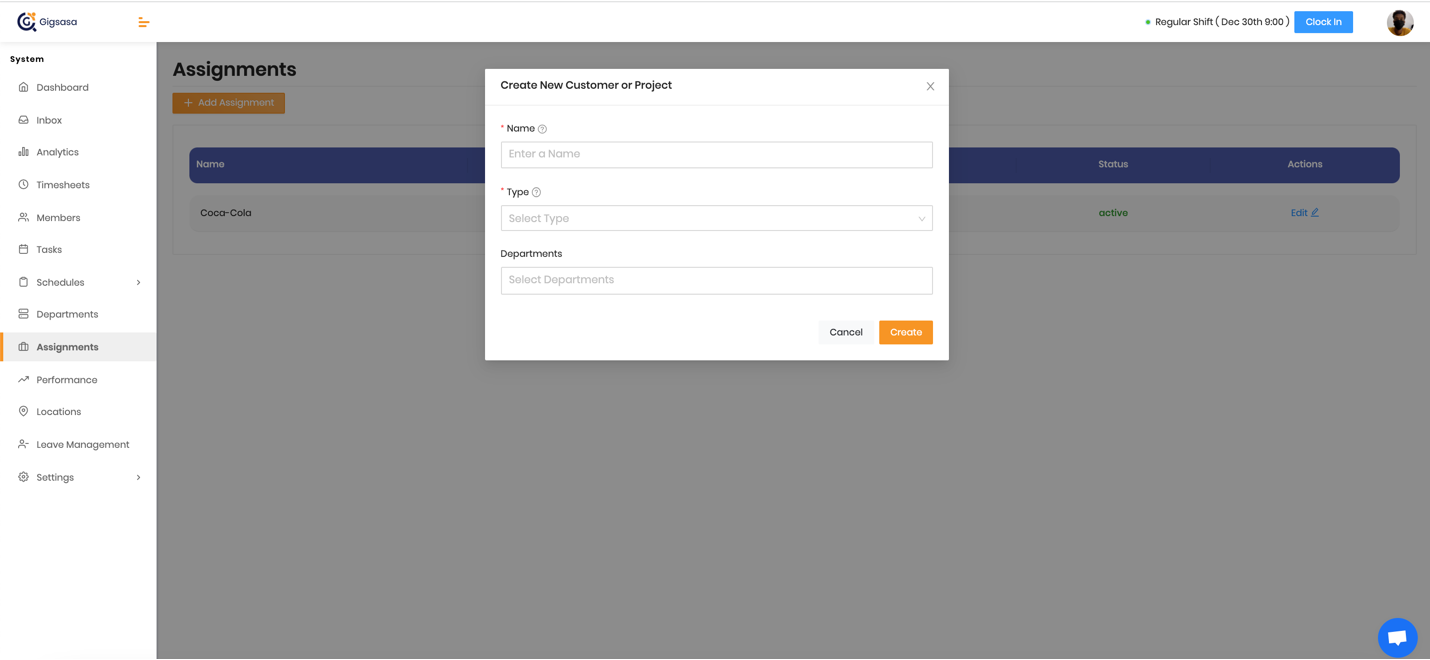
To create new assignments, click on the 'Add Assignments' tab.
- Enter the name of the assignment, be it a project, a customer, or any relevant
assignment. Select the department the assignment is to be assigned to.
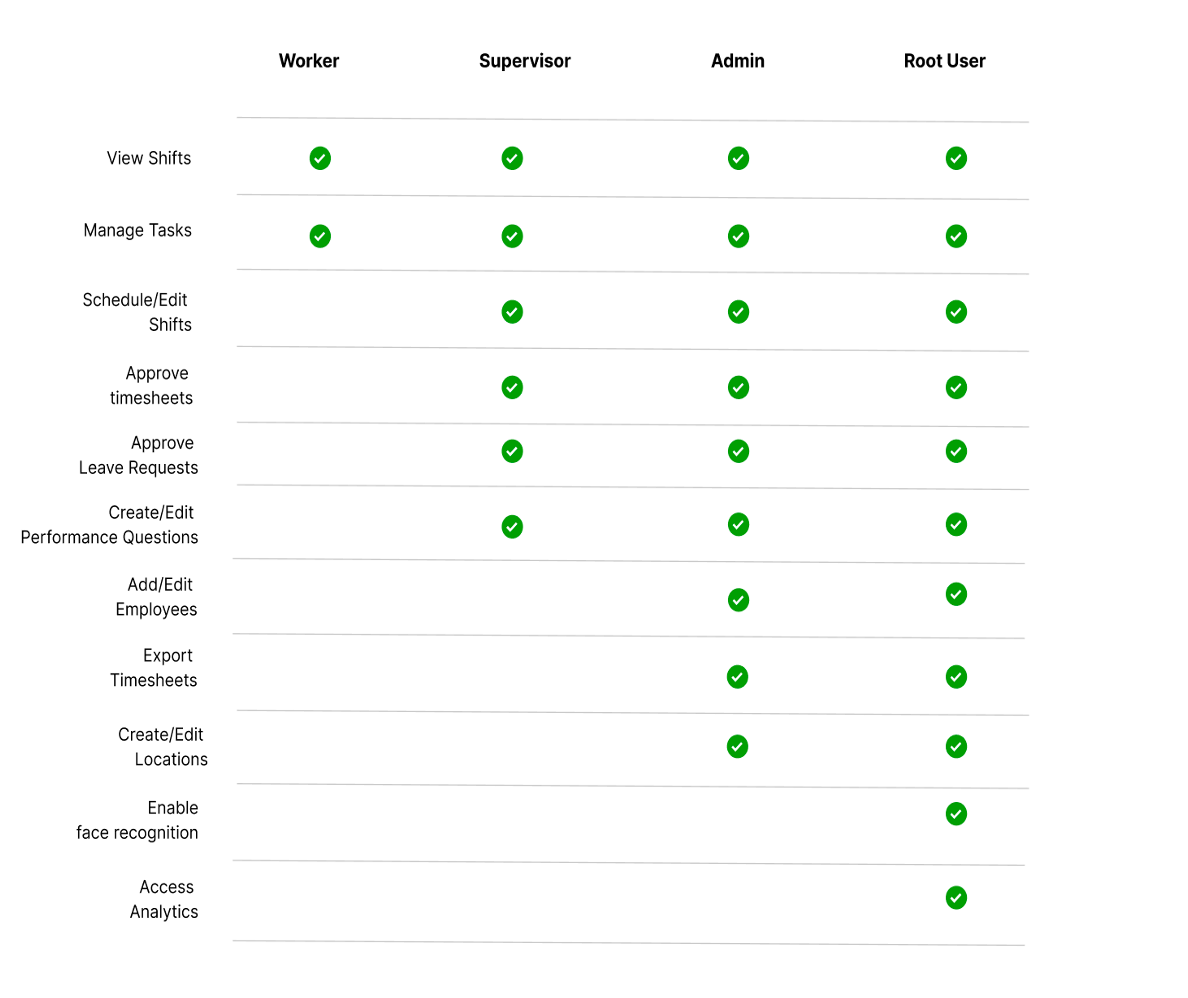
Roles & Access
There are four roles that determine the permissions for your team to access
different
functionalities in GigSasa.
What Should I Use Each Access Level For?
- Worker
These are your base staff, typically those you want only to clock in and
out
with no other management of the system. If the employee only needs to
work
shifts and have no managerial access, grant them this access level.
- Supervisor
These are generally your shift supervisors or team leaders. They can
schedule
within the location(s) that they’re assigned to, as well as approve the
times
(not pay) of a timesheet. They are never able to view costs, either for
a
schedule or for any team members, and can never edit another team
member’s
profile. If you have a team leader who runs a group but has no access to
pay,
give them this access level.
- Admin
These are the staff you trust to run a department. They can view costs,
approve pay, export timesheets and edit employee profiles. They are
completely capable of running a department on their own. Give this
access
level to officers or managers for a particular workplace.
- Root User
A root user can do absolutely everything there is to do
within the system. They are generally the business owners or
administrative heads of the business. Do not make anyone this access
level unless you trust them access to everything in the account.
Pictured below is an overview of what each Access Level allows:
How Do I change Access Levels?
Note: Only users with an access level of Admin or Root User can
change other users' access levels
- On the Member page click on the edit button to the left of
the team member
you wish to change the access level for.
- Navigate to the Role column and select the role you'd like
a
member to be